Blog

Foolproof Golden Bonfire Caramel
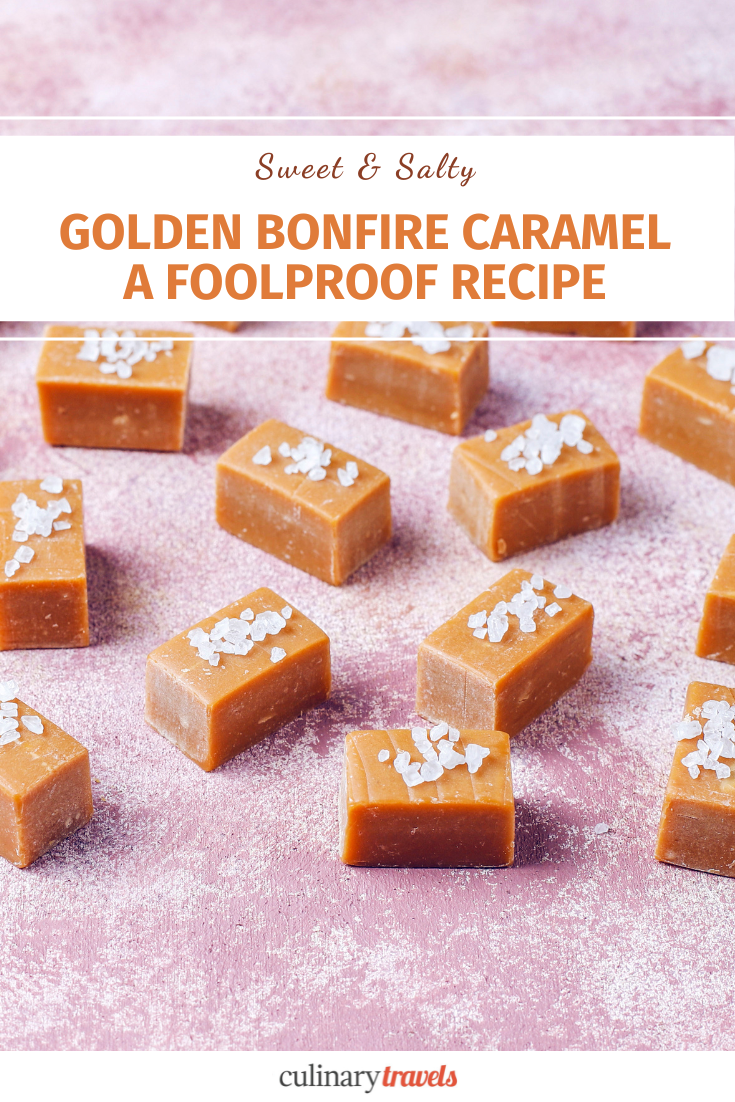
There’s a particular magic to Bonfire Night — the crisp, smoky air, the muffled “oohs” and “aahs” of fireworks, the smell of toasted marshmallows and woodsmoke lingering on coats and scarves. For me, a big part of that nostalgia belongs in the kitchen. These Golden Bonfire Caramels are my homage to those childhood memories: buttery, sweet, golden syrup-kissed, and completely foolproof.
Whether you’re craving soft, creamy squares or a slightly firmer, traditional bonfire chew, these caramels hit the spot. They’re perfect for huddling around a fire on November 5th, but once you make them, you’ll find yourself reaching for them any time of year.
Making them is surprisingly simple: a few staple ingredients, a heavy-bottomed pan, a sugar thermometer, and a steady hand. Watching the sugar and condensed milk transform into glossy, golden caramel is almost magical. The caramel mixture thickens, bubbles, and darkens in colour, releasing a warm, almost nutty scent that fills the kitchen.
While the recipe is straightforward, the caramel itself is endlessly flexible — a pinch of smoked salt, a hint of cinnamon, or some crushed roasted nuts transforms it into something uniquely yours. These caramels are a little act of comfort you can enjoy alone, with family, or as gifts wrapped in parchment.

Ingredients in Homemade Caramels
Butter – provides richness and a glossy finish. Cold from the fridge is fine.
Sweetened condensed milk – the base for a creamy, forgiving caramel.
Brown sugar – adds depth and caramel flavour.
Golden syrup – replaces the more traditional treacle for a lighter, buttery sweetness.
Salt – balances the sweetness and enhances flavour.
Vanilla – pure vanilla bean paste or extract adds warmth and aroma.
Optional finishing salt – flaky sea salt on top for that perfect sweet-salty contrast.

Essential Equipment
To make these caramels successfully (and safely!):
Medium heavy-bottomed saucepan – ensures even cooking and prevents scorching.
Sugar thermometer – precise temperatures are the key to your chosen texture.
Rubber spatula or whisk – for stirring as the caramel cooks.
8-inch / 20 cm square baking tin – lined with parchment for easy removal.
Sharp knife – lightly oiled for clean slicing of set caramel.

Smoke, Spice and All Things Nice
If you fancy taking your golden toffee beyond the basics, these tiny tweaks turn it into something truly bonfire-worthy:
For a smoky edge, swap your regular salt for smoked sea salt. It echoes the scent of woodsmoke and makes every shard taste faintly like a campfire memory.
For a spiced twist, stir in ½ teaspoons of ground ginger, cinnamon, or mixed spice right at the end of cooking. These spices bring a gentle heat that pairs beautifully with the golden syrup’s buttery sweetness.
For a grown-up touch, try a splash of dark rum instead of the vanilla extract.

Bonfire Toffee - A History
Bonfire toffee has a long and storied tradition in Britain, dating back to the 19th century. It was originally a simple, portable treat made from treacle or golden syrup, enjoyed by families gathered around autumn fires to celebrate warmth, community, and the changing seasons. The sweet, chewy pieces were easy to carry and store, making them a practical indulgence for children and adults alike.
Over time, bonfire toffee became synonymous with November 5th, Guy Fawkes Night, when towns and villages lit bonfires, set off fireworks, and shared seasonal treats. The sticky, golden squares offered a comforting counterpoint to the crisp, smoky air, a taste that lingered long after the fire had died down.
Making these caramels today is a way to honour that tradition while adding a modern twist. Using sweetened condensed milk and golden syrup gives a smoother, creamier texture than the original treacle toffee, making it more approachable for families and novice cooks. The recipe preserves the nostalgia of those crisp autumn evenings, the smell of woodsmoke in the air, and the excitement of seasonal festivities, while allowing you to experiment with flavours, textures, and toppings that feel fresh and contemporary.
Whether sprinkled with a pinch of smoked salt, infused with warming spices, or paired with a mug of hot chocolate, these caramels are a small but meaningful connection to history, culture, and the simple pleasures of sharing something homemade with the people you love.

FAQs About Golden Bonfire Caramels
Can I make these without a thermometer?
It’s possible, but a sugar thermometer takes the guesswork out of caramel-making and ensures you achieve either the soft or firmer texture you want. You can also watch the caramel closely: it should thicken, darken slightly, and coat the back of a spoon, but the thermometer guarantees perfect results every time.
Can children help make them?
Yes, they can stir and add finishing touches once the mixture has cooled slightly, but keep them away from the boiling pan, as the caramel will become extremely hot. This is a great opportunity to teach about kitchen safety while sharing the joy of baking together.
How should I store them?
Keep the caramels in an airtight container at room temperature for up to two weeks, or in the fridge if your kitchen is warm. Sprinkle a little extra flaky salt just before serving for a special touch. They also travel well, making them a lovely addition to gift boxes or picnic hampers.
Can I flavour them differently?
Absolutely. A pinch of ground ginger, cinnamon, or a few drops of dark rum can add a grown-up twist. Crushed nuts or sesame seeds on top add crunch and visual appeal. You can even swirl in a little cocoa powder or drizzle melted chocolate over the top for a decadent variation.
Can I make these in advance or freeze them?
Yes, you can make them a few days ahead and store them in the fridge. If you wish to freeze, wrap individual pieces in parchment paper first to prevent sticking. Thaw at room temperature before serving.
What’s the best way to serve them?
These caramels are perfect on their own, paired with hot chocolate or tea, or nestled alongside other Bonfire Night treats like roasted nuts or toasted marshmallows. They make a special touch on a dessert board or as little homemade gifts.
Can I make these in smaller or larger batches?
Yes, you can scale the recipe up or down. Just be mindful that a larger batch will take slightly longer to reach the correct temperature, and a smaller batch may cook faster, so keep a close eye on the sugar thermometer.
What is the difference between soft and chewy caramel?
The final texture depends on how long you cook the caramel. Cook to 118–120 °C / 240 °F for soft, creamy squares or 124–126 °C / 255–260 °F for firmer, chewier bonfire-style caramel. The higher temperature removes a bit more moisture, giving the caramel a denser texture.
Can I use other types of sugar or syrup?
Light brown sugar and golden syrup give the most classic flavour and texture, but you could experiment with dark brown sugar for a deeper caramel taste. Avoid using corn syrup as it may alter the texture slightly.
How do I prevent the caramel from sticking to the pan or knife?
A heavy-bottomed pan ensures even heating, and lining your tin with parchment makes removal simple. Lightly oiling the knife before cutting helps keep the edges neat and prevents sticking.
Can I add flavours like chocolate, coffee, or nuts?
Yes! Once the caramel is set, stir in finely chopped roasted nuts, a teaspoon of instant coffee, or drizzle melted chocolate on top. Just avoid adding wet ingredients during cooking, as they can interfere with the sugar setting.
Foolproof Golden Bonfire Caramels (Soft or Chewy)
Step-by-step recipe with temperature options for soft or firmer caramels.

Ingredients
90 g unsalted butter (cold from the fridge)
1 × 395 g tin sweetened condensed milk
185 g soft light brown sugar
50 g golden syrup
½ teaspoon fine sea salt
½ teaspoon vanilla bean paste or extract
Flaky sea salt to finish (optional).
Method
1. Grease and line a 20-cm square tin with baking parchment, leaving the paper to overhang the sides for easy removal.
2. In a medium heavy-bottomed saucepan, combine the butter, condensed milk, brown sugar, and golden syrup. Set over medium–high heat and stir until combined.
3. Bring to a steady boil and cook, stirring constantly, until the mixture reaches your chosen final temperature: 118–120 °C / 240 °F for soft caramels or 124–126 °C / 255–260 °F for firmer chew. Watch closely and lower the heat if needed to prevent catching.
4. Remove from heat and stir in salt and vanilla, mixing well.
5. Pour into prepared tin, tilt to level, and let cool 10–15 minutes at room temperature, then chill at least 2 hours until set.
6. Lift the caramel slab using the parchment sling and slice with a sharp or lightly oiled knife. Sprinkle with flaky sea salt if desired.
Notes & Tips
For a smoky edge, add a tiny pinch of smoked sea salt. After removing the pan from the heat, stir in ½ tsp ground ginger, cinnamon, or pumpkin spice for added spice. Scatter crushed roasted nuts for added crunch before pouring into the tin.
There’s a quiet magic in holding a golden caramel between your fingers, letting the buttery sweetness melt on your tongue while the soft glow of firelight dances around you. Each square is a little memory, a whisper of smoky evenings, shared laughter, and the comforting rhythm of seasonal traditions. Whether you sneak one while no one’s watching, offer them to friends with a smile, or wrap a few as thoughtful gifts, these caramels are more than a treat — they’re a moment to pause, savour, and celebrate the simple joys of autumn. Make a batch, take your time with each bite, and let the warmth linger just a little longer.
✨ As seen at No.1 on Google for “best ever bonfire caramel” — thank you for every save, stir and share.

✨ Stay Connected with Culinary Travels ✨
Loved this post? 🍴 Don’t let the conversation end here! Join me for behind-the-scenes kitchen moments, foodie adventures, and plenty of inspiration:
👉 Facebook | Instagram | Pinterest
💌 Got thoughts, questions, or your own foodie stories to share? I’d love to hear from you — just drop me a note through my contact form.
📬 Hungry for more?
Subscribe to my newsletter for exclusive recipes, travel tips, and behind-the-scenes foodie fun: Sign up here
🌍 Sharing is caring! If this post made you hungry for more, please pass it along. Every share helps this little corner of the internet grow, and I’m so grateful for your support. ❤️

©2026 Culinary Travels. Culinary Travels is written and edited by Georgina Ingham | Website designed by The Smarter Web Company
What Our Followers Say
"Oh yum!!! I could eat one or two right now!"
Sami Tamimi
"Georgina was great to work with, quick to respond, and is an excellent content writer - would highly recommend collaborating with her!"
Nick S, Get Blogged
Our list of things to do in Cork has just expanded hugely thanks to Culinary Travels.
Triskel Art Centre Cork